How has your week been?
When I haven't been painting, I've been researching, studying, and practicing my photography.
I built a softlight box, used to light food shots.
My downfall is that my wonky schedule (go to sleep around 5 AM, wake up at noon or 1:00, such is the life of a cop and his wife) doesn't lend itself to photography by natural light. Anything I bake will be done around 4 at the earliest, which is already past optimal natural light time.
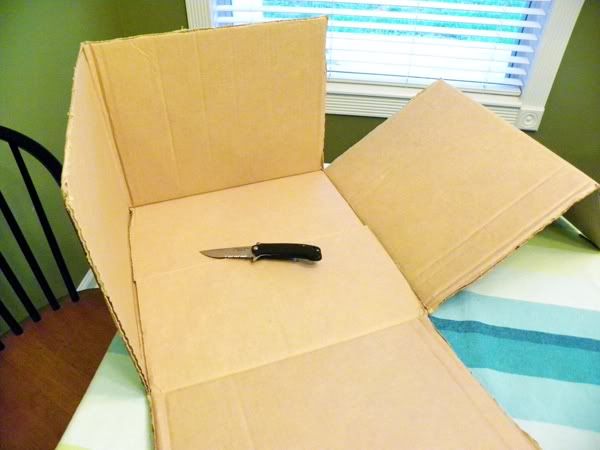
So I researched DIY softlights, since the $90 versions were unacceptable to me. And after a trip to JoAnn and Home Depot, I built myself a pretty awesome box.
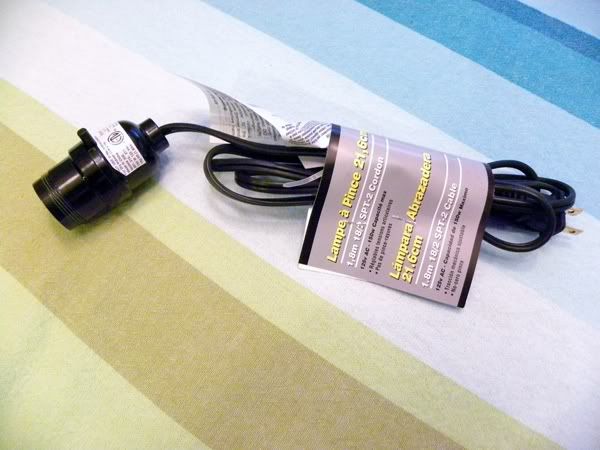
At Home Depot, I bought a clamp light (which, those things are awesome, and I'm planning to get at least two more of those) and took off the metal shade, leaving me with a light bulb socket and a long cord. Not bad!
At JoAnn Fabrics, I bought rip-stop nylon, which is what goes on the front of the boxes to diffuse the light. I learned all of this from an online DIY, and while mine isn't the same as the one from the tutorial, it still functions for what I need.

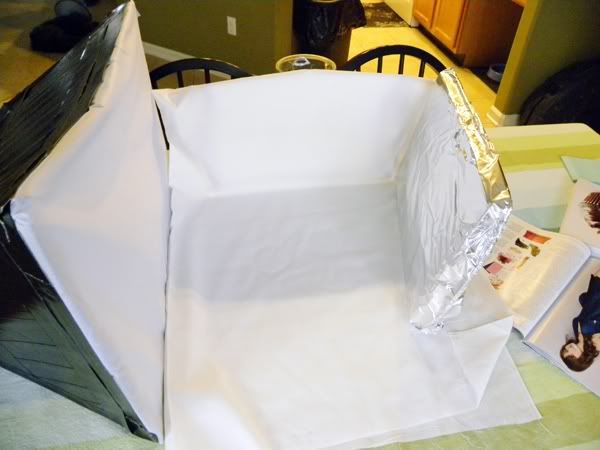
I also got some plain white cotton fabric from JoAnn's and constructed this crude photo studio on the kitchen table. It's taken me a while to get used to the manual settings on my camera, but I've been practicing as often as possible.
This picture, for example:

It originally didn't look so great. I loved the shot, but the ganache was too dark in the original. This is where my four years of messing around in Photoshop really came in handy! I was able to correct it to a proper brightness and contrast without washing out the white of the bowl and fabric in the bottom left corner:

I manually adjusted it using a color curve:

The higher dot (to the far right) is what kept it from washing out the whites, whereas the lower dot (which is further from the original line) is what I dragged upward to brighten the darkness of the ganache. As you can see in the layers window, that was really the only adjustment the picture needed. Hopefully, with practice, my photos won't even need this much post-editing.
A few of my shots came out perfectly with no retouching:

This is exactly how it looked when I imported it from my camera, no adjustments needed. Yay!
Some of them were pictures I knew I would have to adjust in Photoshop. This one with cupcake liners had a lot going on, it was originally a very pretty but rather flat shot. A complicated curve adjustment fixed it up nicely, making it pop the way it did in real life:

And then this one, with the chocolate chips being melted by the hot cream for the ganache, needed a lot of love from the brightness adjustment layer:

On the other hand, I wasn't thinking when I threw this chocolate-water mixture into a small orange bowl. All of the shots were loud and over-exposed. Over-exposure is difficult to adjust after the fact, and this was the best I could do:

But the cupcakes themselves--Martha Stewart's Devil's Food Cupcakes--were a lot of fun to photograph!


At JoAnn Fabrics, I bought rip-stop nylon, which is what goes on the front of the boxes to diffuse the light. I learned all of this from an online DIY, and while mine isn't the same as the one from the tutorial, it still functions for what I need.
This is around the time friends and family started asking why I needed this... and subsequently discovered that I have a blog.
This picture, for example:
It originally didn't look so great. I loved the shot, but the ganache was too dark in the original. This is where my four years of messing around in Photoshop really came in handy! I was able to correct it to a proper brightness and contrast without washing out the white of the bowl and fabric in the bottom left corner:
I manually adjusted it using a color curve:
The higher dot (to the far right) is what kept it from washing out the whites, whereas the lower dot (which is further from the original line) is what I dragged upward to brighten the darkness of the ganache. As you can see in the layers window, that was really the only adjustment the picture needed. Hopefully, with practice, my photos won't even need this much post-editing.
A few of my shots came out perfectly with no retouching:
This is exactly how it looked when I imported it from my camera, no adjustments needed. Yay!
Some of them were pictures I knew I would have to adjust in Photoshop. This one with cupcake liners had a lot going on, it was originally a very pretty but rather flat shot. A complicated curve adjustment fixed it up nicely, making it pop the way it did in real life:
And then this one, with the chocolate chips being melted by the hot cream for the ganache, needed a lot of love from the brightness adjustment layer:
On the other hand, I wasn't thinking when I threw this chocolate-water mixture into a small orange bowl. All of the shots were loud and over-exposed. Over-exposure is difficult to adjust after the fact, and this was the best I could do:
But the cupcakes themselves--Martha Stewart's Devil's Food Cupcakes--were a lot of fun to photograph!
Thanks to my new light, these look delectable, and there's no beige counter to make them look dingy!
These cupcakes were extra special, partially because they were my first mini-cupcakes ever, but also because I ran out of vanilla extract. Instead of buckling under yet another shopping list failure, I whipped out the almond extract and used that instead. Talk about an extra flavor dimension! Everyone raved about these tiny bad boys, I may not use vanilla extract in this recipe ever again!
Mmm! One last shot for the road?
No comments:
Post a Comment